Subscriptions in WooCommerce
If you have a product suitable for memberships, subscriptions or other types of recurring payments, you can offer recurring payments in WooCommerce through us.
Our plugin is free. Recurring payments have the same transaction fees as one-time (regular) payments. Here's how to get going with recurring payments in WooCommerce.
1. Agreement
You require an agreement which is set up for recurring payments. You can apply for an agreement for card payments and direct bank with recurring payments. Manual invoice also works for recurring payments.
If you want, you can try test payments in test mode with test cards. When you're ready, please fill in your business details in our Onboarding that you find in Account details, to get started towards an agreement for live payments.
2. Plugin Installation
To install Mondido's WooCommerce-plugin, please follow the steps in our guide Integrate Mondido in WooCommerce.
OBS. For subscriptions, the module "Mondido - Mondido Payments" must be configured (even if it's not active).
3. Create plan
- Log in to the Mondido admin.
- Go to Billing plans.
- Press "Create new".
- Name the plan. Adding a description is optional.
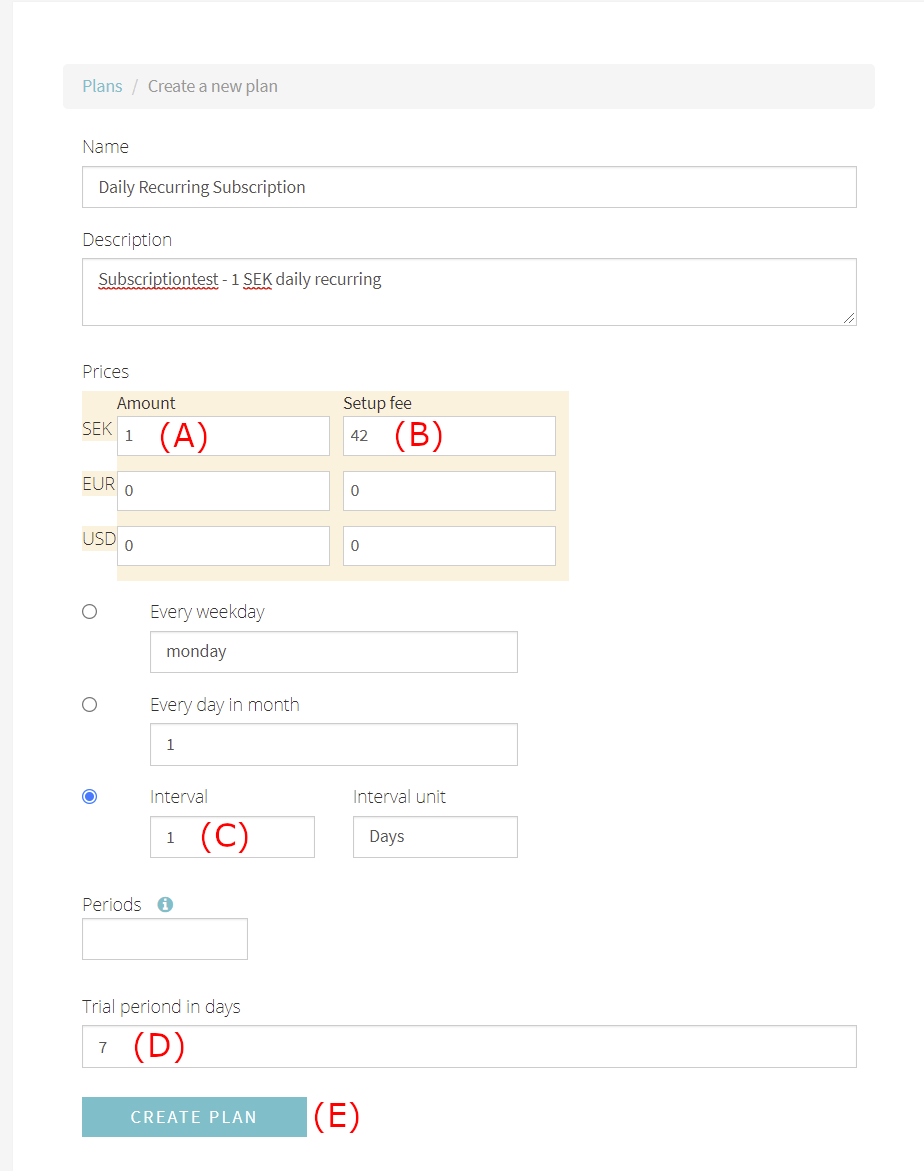
(A) Amount is the recurring price. Subscribers pay this at the start of every subscription period. Add amount for the currencies you have available and wish to offer your customers. It should be total amount including VAT, shipping costs etc.
- Special case: when using Trustly direct debit for subscriptions, 0 does not work as amount, it needs to be greater than 0.
(B) Setup fee is an initial fee at subscription setup. Subscribers pay this instantly at the time they subscribe. If you don’t want an initial cost, write 0 here.
(C) Interval is a time measuement.
- Interval: how often the amount from (A) will be deducted.
- Interval unit: whether interval is counted in days or months.
- Periods: if you want the subscription to end after x periods, you can specify x here.
(D) Trial period is an optional free period before the subscription starts (before the first amount is deducted). For instance, if you write 7 here, Amount will be deducted once 7 days have passed. Please note that Setup fee is always deducted instantly irrespective of trial period. Leave trial period empty in order to omit trial period entirely (same as writing 0 in this field).
Worth noting: if the plan does not have a test period, two deductions will be made at subscription setup. First, the one customers see in the payment window which saves card information and sets up the subscription. Secondly, the first period will be charged immediately.
(E) Create plan - click the "Create plan" button to create the plan.
3.1 Plan examples
Here are a few example settings and their resulting plans.
EXAMPLE 1
Plan:
Interval = 1 Interval unit = months
Result:
This plan will charge money every month.
EXAMPLE 2
Plan:
Interval = 3 Interval unit = months Periods = 12
Result:
This plan will charge money every 3rd month 12 times. That is, for a duration of 36 months (3 years), money is charged once per quarter.
EXAMPLE 3
Plan:
Interval = 7 Interval unit = days Periods = 52
Result:
This plan will charge money every 7 day 52 times. That is, for a duration of 1 year, subscribers are charged once per week.
EXAMPLE 4
Plan:
Interval = 1 Interval unit = months Periods = 5 Trial period = 30 days
Result:
This plan will charge money 30 days after the initial setup, then every month for 5 months. That is, for a duration of half a year, subscribers are charged once a month (including initial setup).
4. Add product
Go back to WooCommerce and go to "Products"
Press "Add New". You will now add the product which customers shall be able to subscribe to:
- Name it and describe it with text and images, just like a regular product.
- Under "product data", do the following:
- Mark "virtual".
- "Regular price (kr)" should be 0 or the price of the product. A numer must be put in. See more under "Mondido subscription" below.
- Under "Sale price (kr)", write 0.
- Go to "Mondido subscription" -> "Subscription plan". Choose which plan you wish to use (see 3. Create plan above).
- Enable the checkbox “Add product to the recurring payments” if you want the product to be included in the recurring transactions for the subscription. This is required if you want VAT to be calculated for the recurring transactions.
- Please note that if a product is added, the product price will be added to the recurring payment. Thus, we recommend that you set the plan’s recurring price ("Amount") to 0 and use the price of the product as recurring price instead.
- Please also note that if you get error under "subscription plan", look through if you have added the required settings in the module "Mondido - Mondido Payments" (the module doesn't need to be active).
- To the right under "Product categories", choose categories for your product (optional).
- Press "Publish" (or "Update" if you edited an already existing product).
Now your customers should be able to purchase the product and create a subscription.
Tip: to avoid rounding errors, make sure you've set up your currency with the right number of decimals in WooCommerce. This is two decimals for most currencies.
Number of decimals can be configured in your WordPress admin under "WooCommerce -> Settings -> General -> Number of decimals".
5. Webhooks
You can create a webhook which goes to an address where you collect all failed payments. This is suitable to do for contacting customers if they had insufficient funds or an expired card etc. Then you can help the customer make the subscription go through or cancel the subscription if needed.
When a subscription transaction is declined, we try again every day for a duration of 30 days (by default). These attempts are made at nighttime.
To create a webhook:
- Go to Mondido admin
- In the menu to the left, click "Webhooks".
- In the dropdown menu under "Create webhook", click "Choose type" and select "E-mail".
- Under "Create e-mail webhook", select "After failed payment".
- Under "E-mail", write the address to which you want to send information about failed transactions.
5.1 Receipt
You can also create a webhook to send a receipt to the customer:
- Log in to your Mondido account.
- In the menu to the left, go to Webhooks.
- In the dropdown menu under "Create webhook", click "Choose type" and select "Receipt".
- Under "Create receipt webhook", select "After successful payment".
- You can leave "Sender" as it is or you can use a custom e-mail address of your own. If you want to use your own custom address, it must first be added under Integration - Apps - Email addresses. This is the e-mail address the customer will see that the receipt is sent from.
- Under "E-mail address", write which e-mail address the receipt should be sent to. You can fetch the customer’s email address from the transaciton metadata by writing {{ transaction.metadata['customer']['email'] }} (requires metadata in matching format)
- "Subject" is the title of the email to the customer.
- Under "Email body", you can customise the text in the email. You can use HTML code and Liquid syntax.
- "Tags" can be left empty.
If you have a product suitable for memberships, subscriptions or other types of recurring payments, you can offer recurring payments in WooCommerce through us.
Our plugin is free. Recurring payments have the same transaction fees as one-time (regular) payments. Here's how to get going with recurring payments in WooCommerce.
1. Agreement
You require an agreement which is set up for recurring payments. You can apply for an agreement for card payments and direct bank with recurring payments. Manual invoice also works for recurring payments.
If you want, you can try test payments in test mode with test cards. When you're ready, please fill in the form on this page in our admin to get started towards an agreement for live payments.
2. Plugin Installation
To install Mondido's WooCommerce-plugin, please follow the steps in our guide Integrate Mondido in WooCommerce.
OBS. For subscriptions, the module "Mondido - Mondido Payments" must be configured (even if it's not active).
3. Create plan
- Log in to the Mondido admin.
- Go to Billing plans.
- Press "Create new".
- Name the plan. Adding a description is optional.

(A) Amount is the recurring price. Subscribers pay this at the start of every subscription period. Add amount for the currencies you have available and wish to offer your customers. It should be total amount including VAT, shipping costs etc.
- Special case: when using Trustly direct debit for subscriptions, 0 does not work as amount, it needs to be greater than 0.
(B) Setup fee is an initial fee at subscription setup. Subscribers pay this instantly at the time they subscribe. If you don’t want an initial cost, write 0 here.
(C) Interval is a time measuement.
- Interval: how often the amount from (A) will be deducted.
- Interval unit: whether interval is counted in days or months.
- Periods: if you want the subscription to end after x periods, you can specify x here.
(D) Trial period is an optional free period before the subscription starts (before the first amount is deducted). For instance, if you write 7 here, Amount will be deducted once 7 days have passed. Please note that Setup fee is always deducted instantly irrespective of trial period. Leave trial period empty in order to omit trial period entirely (same as writing 0 in this field).
Worth noting: if the plan does not have a test period, two deductions will be made at subscription setup. First, the one customers see in the payment window which saves card information and sets up the subscription. Secondly, the first period will be charged immediately.
(E) Create plan - click the "Create plan" button to create the plan.
3.1 Plan examples
Here are a few example settings and their resulting plans.
EXAMPLE 1
Plan:
Interval = 1 Interval unit = months
Result:
This plan will charge money every month.
EXAMPLE 2
Plan:
Interval = 3 Interval unit = months Periods = 12
Result:
This plan will charge money every 3rd month 12 times. That is, for a duration of 36 months (3 years), money is charged once per quarter.
EXAMPLE 3
Plan:
Interval = 7 Interval unit = days Periods = 52
Result:
This plan will charge money every 7 day 52 times. That is, for a duration of 1 year, subscribers are charged once per week.
EXAMPLE 4
Plan:
Interval = 1 Interval unit = months Periods = 5 Trial period = 30 days
Result:
This plan will charge money 30 days after the initial setup, then every month for 5 months. That is, for a duration of half a year, subscribers are charged once a month (including initial setup).
4. Add product
Go back to WooCommerce and go to "Products"
Press "Add New". You will now add the product which customers shall be able to subscribe to:
- Name it and describe it with text and images, just like a regular product.
- Under "product data", do the following:
- Mark "virtual".
- "Regular price (kr)" should be 0 or the price of the product. A numer must be put in. See more under "Mondido subscription" below.
- Under "Sale price (kr)", write 0.
- Go to "Mondido subscription" -> "Subscription plan". Choose which plan you wish to use (see 3. Create plan above).
- Enable the checkbox “Add product to the recurring payments” if you want the product to be included in the recurring transactions for the subscription. This is required if you want VAT to be calculated for the recurring transactions.
- Please note that if a product is added, the product price will be added to the recurring payment. Thus, we recommend that you set the plan’s recurring price ("Amount") to 0 and use the price of the product as recurring price instead.
- Please also note that if you get error under "subscription plan", look through if you have added the required settings in the module "Mondido - Mondido Payments" (the module doesn't need to be active).
- To the right under "Product categories", choose categories for your product (optional).
- Press "Publish" (or "Update" if you edited an already existing product).
Now your customers should be able to purchase the product and create a subscription.
Tip: to avoid rounding errors, make sure you've set up your currency with the right number of decimals in WooCommerce. This is two decimals for most currencies.
Number of decimals can be configured in your WordPress admin under "WooCommerce -> Settings -> General -> Number of decimals".
5. Webhooks
You can create a webhook which goes to an address where you collect all failed payments. This is suitable to do for contacting customers if they had insufficient funds or an expired card etc. Then you can help the customer make the subscription go through or cancel the subscription if needed.
When a subscription transaction is declined, we try again every day for a duration of 30 days (by default). These attempts are made at nighttime.
To create a webhook:
- Go to Mondido admin
- In the menu to the left, click "Webhooks".
- In the dropdown menu under "Create webhook", click "Choose type" and select "E-mail".
- Under "Create e-mail webhook", select "After failed payment".
- Under "E-mail", write the address to which you want to send information about failed transactions.
5.1 Receipt
You can also create a webhook to send a receipt to the customer:
- Log in to your Mondido account.
- In the menu to the left, go to Webhooks.
- In the dropdown menu under "Create webhook", click "Choose type" and select "Receipt".
- Under "Create receipt webhook", select "After successful payment".
- You can leave "Sender" as it is or you can use a custom e-mail address of your own. If you want to use your own custom address, it must first be added under Integration - Apps - Email addresses. This is the e-mail address the customer will see that the receipt is sent from.
- Under "E-mail address", write which e-mail address the receipt should be sent to. You can fetch the customer’s email address from the transaciton metadata by writing {{ transaction.metadata['customer']['email'] }} (requires metadata in matching format)
- "Subject" is the title of the email to the customer.
- Under "Email body", you can customise the text in the email. You can use HTML code and Liquid syntax.
- "Tags" can be left empty.